


In a sure sign of impending doom, we’re in the grips of a bread shortage. Here’s why you should learn how to make your own.
In case you haven’t heard, we’re in crisis mode up here in the upper North Island. Supermarkets are running out of bread. Bread! The staff of life! What did we do to deserve this? Is it a sign that the apocalypse is near?
Well, quite possibly, but it may also have something to do with the fact that for the past couple of weeks, the workers at George Weston Foods’ Ōtāhuhu and Wiri bakeries in South Auckland have been striking for fair pay and a premium on overtime and night work. It began with a ban on overtime and deep cleaning, reported Stuff, culminating in a full two-day strike on Sunday and Monday. GWF makes the Tip Top range, as well as Ploughmans and Bürgen, and during the strike action production at the aforementioned factories were halved (they also make Big Ben pies and Golden crumpets, but The Spinoff is not aware of any shortages of either delicacy – praise be).
According to the Herald, some supermarkets still had empty bread shelves yesterday, several days after the strike ended, and in-store bakeries were “scrambling to produce extra bread for hungry customers”. Stuff reported that further strike action was likely in the coming weeks as the company and its workers are yet to reach a resolution – and that could mean further shortages.

So what can we do? Weep? Sure, I find that helps in most scenarios. Adopt a *shudder* keto diet? Absolutely fucking not. What we can do, friends (other than, you know, buy non-GWF brands or splash out on fancy sourdough from the local bougie bakery), is make our own.
I always thought bread-making was the preserve of smug fancy folk with too much time on their hands, but then I did a sourdough workshop and fully morphed into one of the aforementioned smug fancy folk. The fact I have kept a stinky starter alive for two whole years is by far my biggest achievement in life to date.
Sam Ellis of Grizzly Baked Goods, a Christchurch purveyor of bloody good sourdough, doughnuts, pastries and bagels, agrees that making one’s own bread can be an intimidating prospect for the layman.
“It’s really all in the preparation,” he says. “With any recipe for bread, all of the time components are pretty non-negotiable. You have to leave yourself the amount of time that is necessary – you can’t rush anything.”
However, what many people don’t fully realise is that much of the time involved in bread-making is “passive time” – time spent doing bugger all.
“A recipe might look like it takes five or six hours but there will actually only be 20-30 minutes of work involved,” explains Ellis. “People might think they have to be home for six hours straight looking after this dough while it rises, but it’s usually broken up until small time components you can just work your day around.”
His top tip for a beginners: don’t bother trying to do it by hand. Use a stand mixer and you’ll be away laughing. “It [hand mixing/kneading] just puts people off because you don’t get a great result.” With a stand mixer, you can simply turn it on and walk away for five minutes or so. “It’s very hard to over-mix a dough in a home stand mixer.”
On the contrary, under-mixing is a common issue among home bakers, says Ellis, along with under-fermenting. “If your dough has been mixed well, it’s likely going to ferment well because it needs that conditioning to set it off on the right path.”
Ellis recommends new bakers get their hands on some starter and go down the sourdough route – he’s kindly shared his recipe for a simple sourdough pan loaf below, one that will work very nicely thinly sliced to make a lovely sandwich. You can also make it with baker’s yeast.

If you’re terrified by the concept of sourdough, mate, I hear you – but seriously, I’d never made a decent loaf of bread in my life and I swear to god I’m now a quite good sourdough maker. Honestly, it’s not that hard, and the results are worth it. Take an empty jar to your local bakery and ask nicely and they’ll probably give you some starter. Hell, I’ll give you some of mine if you like (just don’t kill it, please).
If you do you use yeast, Ellis advises using slightly less than most recipes call for and extending the fermentation process. “If you’re not using sourdough, anything that can slow the process down is going to make for a better-flavoured loaf – you don’t want something that’s going to be too fast as it’s not really going to ferment, it’s just inflating and there’s not going to be a lot of flavour there.”
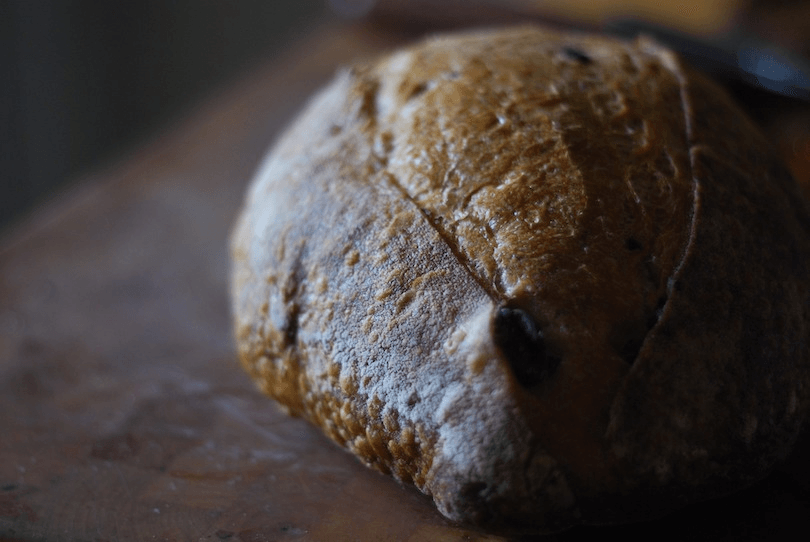
When it comes to the bake, the secret is to cook your loaf inside something that will trap the steam. A cast-iron combo-cooker/Dutch oven (not the farting under the duvet kind) is ideal, but basically any dish that fits your loaf topped with a lid of some form will do. If you don’t have something suitable, in the below recipe, you can simply put a second loaf pan on top of the one holding your dough. “The loaf’s going to make its own steam and it’s going to help the bread rise and you’ll see some pretty good results,” says Ellis.
And trust me, achieving “pretty good results” in the bread-making department can be a truly soul-enriching, life-affirming and, of course, bloody delicious experience.

DIY SOURDOUGH PAN LOAF
Recipe by Sam Ellis of Grizzly Baked Goods
Ingredients
- 350g high-grade flour
- 250g warm water
- 75g ripe sourdough leaven/starter/levain* (Ellis refers to starter as the stuff you keep and leaven as the part of it that you’ve fed to use in your dough. It’s confusing as hell and there are different theories but for simplicity’s sake let’s just say they’re all pretty much the same thing.)
- 8g salt
You will need
- Stand mixer with dough hook
- Rubber scraper
- Non-stick loaf tin 22cm x 11cm (line with baking paper if you’re not confident in the non-stickness)
- Small serrated knife, very sharp
- Large dish with lid**
Time required
- Mix: 10 minutes + 10 minutes
- Rest: 3 hours (with stretches at the one- and two-hour marks)
- Shape: 5 minutes
- Proof: 2 hours (or overnight in the fridge)
- Bake: 1 hour
Combine the flour and water in the bowl and fit to your stand mixer. Mix on low speed until just combined (two minutes). Cover the bowl with a tea towel and leave it for 30-60 minutes. This will do half the mixing work for you.
Add in the leaven and salt. Mix on low-medium speed for 7-8 minutes until smooth and elastic. Cover the bowl with a tea towel and leave in a warm place (~25°C) for three hours. At the one-hour and two-hour marks of your dough sitting in its bowl, pick up the dough with two hands and stretch it as far as you can without it breaking, roll it up and place back in the bowl.
After three hours, the dough is ready to shape. Tip it out onto a lightly floured surface and lightly pat it out flat into a circle 20cm across. Pick up the leftmost and rightmost edges of the dough with your thumb and forefingers. Stretch these two edges together and bring them to the middle of your dough and lightly pat the dough down. You should now have straight edges on the two sides of your dough. Now starting at the top of your dough, scroll the dough downwards and let it wind up and curl on itself until you’ve scrolled it all the way to the bottom. Place the dough carefully seam-side down into your loaf pan.
Your dough is ready for its final proof. At this point you can cover it with the tea towel and return it to its warm happy place for two hours, or if you’ve run out of time in the day already, place it in your fridge for anywhere between 10 and 20 hours until you’re ready to bake!
The dough is ready to bake when it has nearly doubled in volume, and has the feel of soft flesh to the touch (too saucy?). Preheat your oven to 220°C fan bake with a rack in the lower part of your oven. If you’re using a Dutch oven or similar, put it in to preheat too.
When the oven – and more importantly, you – are ready, start first by taking your dish** out of the oven (use oven mitts as it will be super hot), placing it on a heatproof surface and taking the lid off. Next, score your loaf with the serrated blade by holding the knife at a low angle to the dough. Starting at the top of the loaf, quickly and confidently pull the blade towards you. It should feel as though you’ve just unzipped the loaf (again, too saucy?). Place the loaf pan inside your dish, put the lid on and place in the oven (or just put a second loaf pan on top of the first and place it directly on the rack in the oven). Set a timer for 20 minutes.
After 20 minutes you can carefully take the lid off your dish and return the loaf pan to the oven. Lower the temperature to 200°C and bake for a further 15-20 minutes until a glossy golden brown, burnished crust has formed. Remove from the oven and carefully de-pan the loaf onto a wire rack. Let cool fully*** and enjoy!
*If you don’t keep a sourdough starter at home, your local baker may give you some of theirs if you bring a jar! Failing that, you can substitute the leaven for a half teaspoon of baker’s yeast – the overnight proof option will help this dough develop more flavour.
**It is crucial in the baking of good bread to trap some steam in the oven while the bread bakes. The simplest way to do this is by putting a lid on the dough (you could literally place a second loaf pan upside down on the top of the first) or by cooking the loaf inside of a large casserole dish/Dutch oven with a lid that can accommodate double the height of the loaf pan. If you are using one of these, place it in the oven while it preheats.
***No one has ever done this in the history of mankind.